What this app is
Shoot Delivery Tracker keeps every booking organised from the moment it lands to the day you hand over the photos or video. For each shoot it tracks:
- Where it is in your workflow — booked, editing, delivered, and any stages you define
- Delivery deadlines, with reminders
- Checklists, packing lists, and shot lists
- The money — fee, deposit, costs, profit, in any currency — and professional PDF invoices
- Golden-hour and sunrise/sunset times for the shoot’s location
- A contact log of calls and emails with the client
It works entirely on your phone, with no account and no internet connection required.
Your privacy
Everything you enter lives only on your device. There’s no account to create, no cloud service, no analytics, and no tracking. The app has no server to send your data to, and it works in airplane mode, at a remote venue, or abroad with no signal.
One feature is the exception, and it is worth naming: the map. Searching for an address, or loading the map to drop a pin, sends that request to Apple Maps on iPhone or Google Maps on Android. Nothing else in the app reaches the internet — even sunrise and sunset are worked out on the phone. On Android you will be asked for location permission the first time you use the map, because Android will not look up an address without it; the app never reads where you are.
The only time anything leaves your phone is when you choose to share it — a PDF invoice you send, a backup file you save, or calendar entries you sync — and each time, you pick where it goes.
Getting started
First launch. The app opens with a set of example shoots so you can explore with real-looking data. A short welcome tour offers to walk you through the main parts — about 60 seconds. Take it, tap Later, or choose Don’t ask again. You can replay it anytime under Settings → Replay welcome tour.
The example data. The demo shoots are there to help you find your way. When you’re ready to start for real, remove them in one tap: Settings → Remove demo data. One tip — wait until you’ve removed the demo data before turning on calendar sync, so the example shoots don’t end up in your real calendar.
Day or night. The app opens in its dark “Darkroom” theme by default. Prefer a light look, or want it to follow your phone? Change it under Settings → Appearance.
The Shoots screen (home)
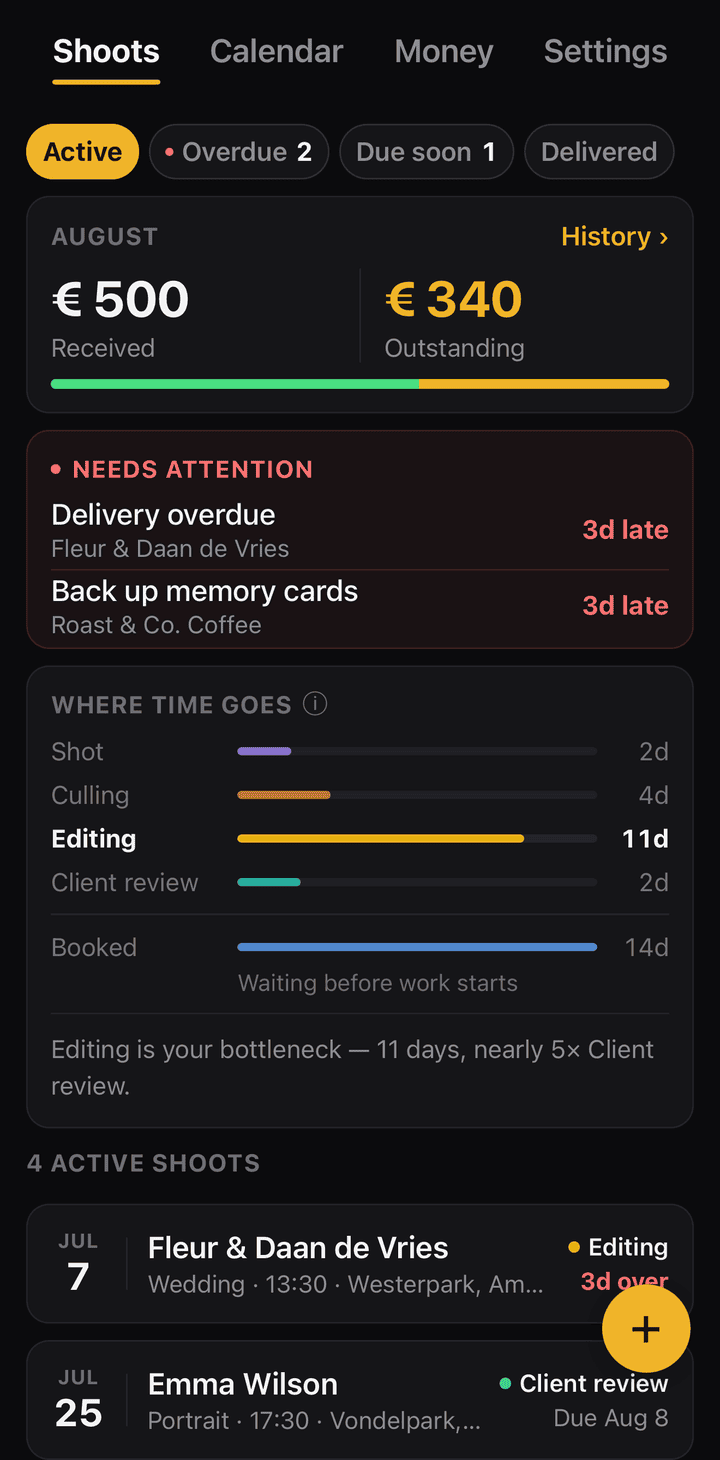
This is your command centre. At the very top are four tabs — Shoots, Calendar, Money, and Settings.
The counters. Three tiles show Active, Overdue, and Due soon (the “due soon” window is however many days you choose in Settings). Tap any tile to filter the list below to just those shoots. Tap Delivered to review finished work.
The cards. Below the counters sit summary cards:
- This month — money received and still outstanding this month. The Money tab at the top opens the full history.
- Needs attention — anything overdue that wants a look. Tap an item to jump straight to that shoot.
- Where time goes — how long, on average, your shoots spend in each stage. A quiet insight into your own workflow.
- Shoot list — your shoots themselves, each as a tappable card.
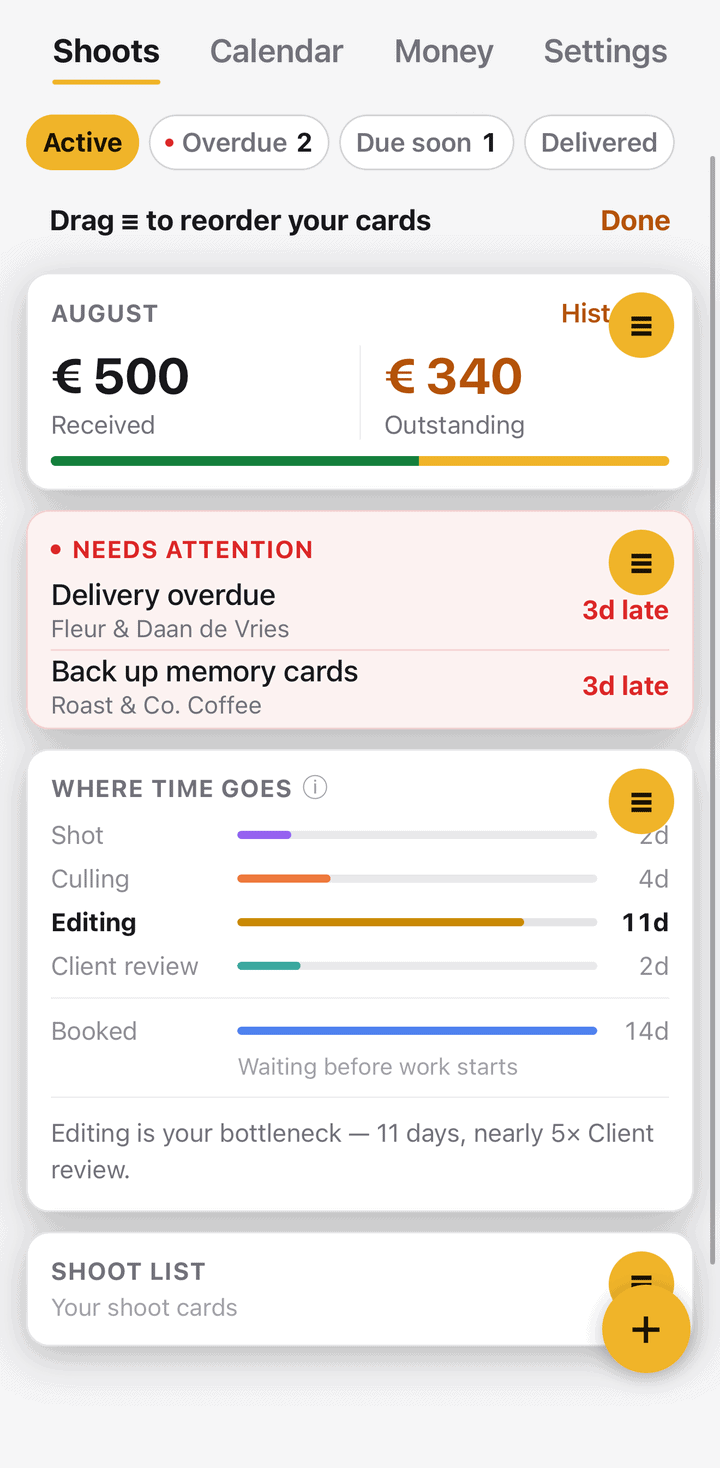
Rearranging the cards. Press and hold any card to enter arrange mode, then drag a card by the ≡ handle in its corner. You can also do this under Settings → Arrange cards. (The same works inside a shoot.)
Adding a shoot. The + button in the bottom-right corner starts a new booking.
Adding and editing a shoot
Tap + on the Shoots screen (or Edit at the top of a shoot to change one). Fill in what you know — anything can be left blank and added later:
- Client name, phone, email
- Shoot type (Wedding, Portrait, and so on — you define these; see Templates)
- Date and time, and duration
- Location — type an address, or tap to pick it on the map. Search for a place or long-press the map to drop a pin. The pin is what powers the Daylight card and “Open in Maps”. Leave the Location field empty and the pin fills in the address for you — anything you typed yourself is never overwritten.
- Delivery deadline — when the finished work is due. It cannot be earlier than the shoot date; the same day is fine.
- Notes
When you create the shoot, its checklist, packing list, and shot list are added automatically from that shoot type’s templates, and it starts at your first stage.
Inside a shoot
Tapping a shoot opens its detail screen — a stack of cards. The client details card always stays on top; the rest you can reorder by pressing and holding any card (or via Settings → Arrange cards → “Inside a shoot”). Each card has a small ⓘ you can tap for a plain-language explanation.
The cards are:
- Daylight — sunrise, sunset, and golden/blue hours for this shoot (see section 9).
- Money — fee, deposit, balance, costs, profit, and invoices (see section 8).
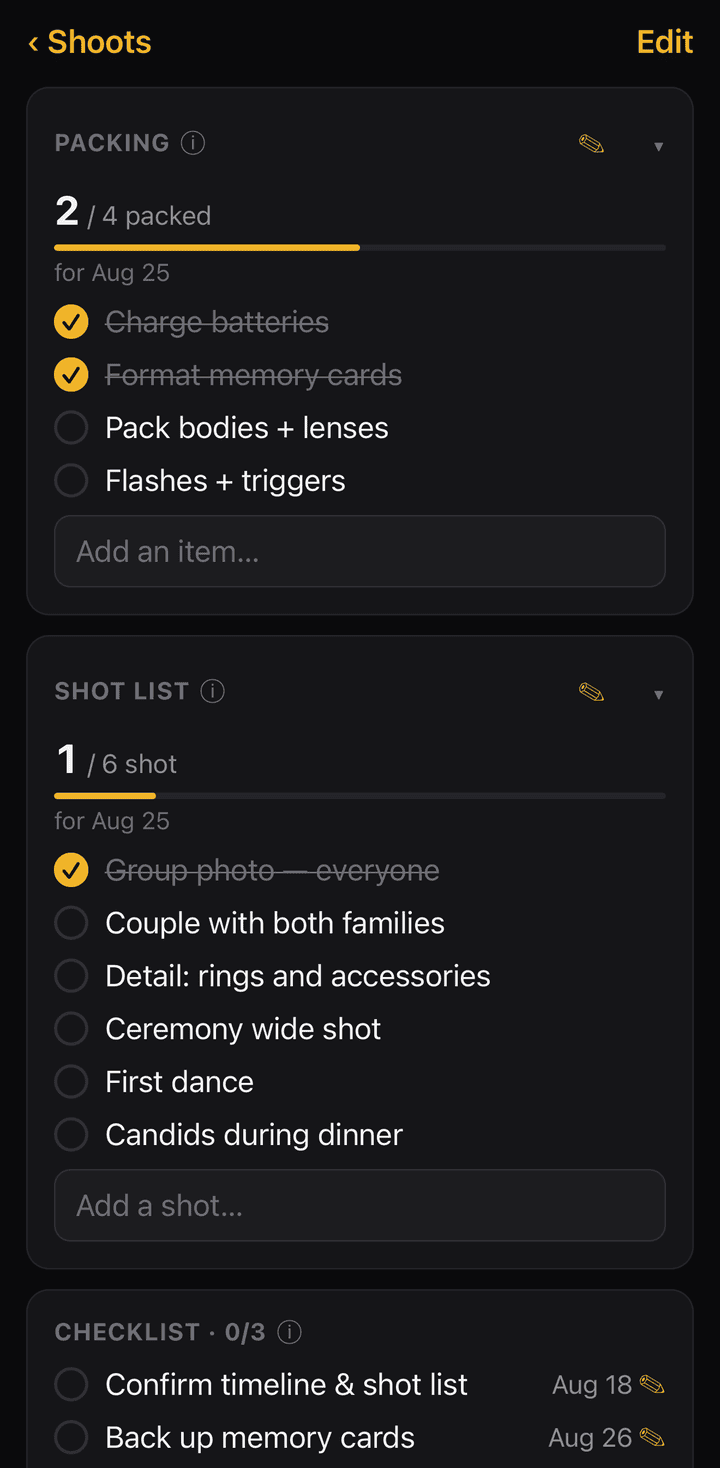
- Packing — the gear to bring on the day. Tick items off as you pack. Packing never counts as “overdue”, and the card folds itself shut once the shoot has passed. Tap ✎ to reorder or remove items, and use the box at the bottom to add one. A shoot with no packing list at all shows + Add a packing item instead, so you can always start one.
- Shot list — the shots to capture on the day, ticked off as you go. Same editing as packing. Add one-offs a client specifically asked for.
- Checklist — your delivery to-dos (“Back up cards”, “Cull selects”, “Order prints”). Tick them in any order. Tap the ✎ beside an item for everything you can do to it: set a due date, remove the due date, or remove the item from the checklist.
- Contact log — a timestamped record of calls, emails, and agreements. Type a note and it’s stamped with the date and time. Long-press an entry to delete it.
- Progress — the stage the shoot is in (see section 7).
At the bottom, the Move to… button moves the shoot to its next stage, and Delete shoot removes it entirely.
Progress stages
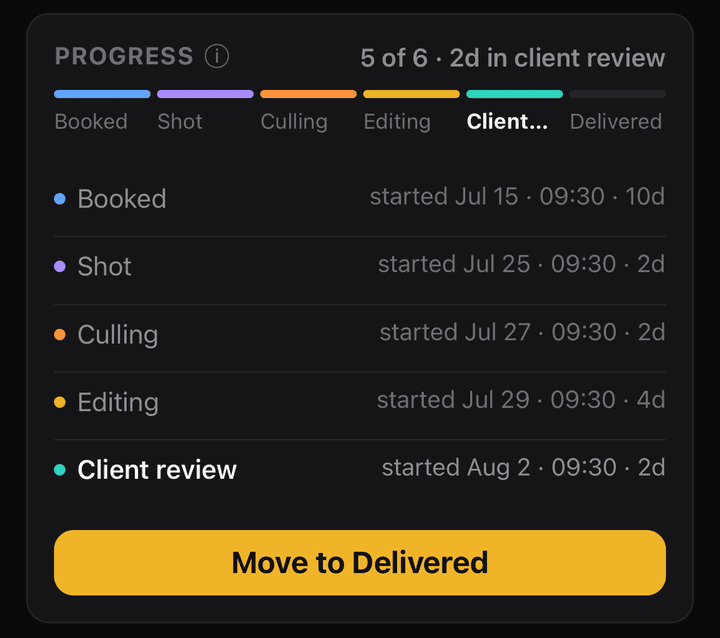
Every shoot moves through a pipeline. Out of the box that’s Booked → Shot → Culling → Editing → Client review → Delivered, but the whole thing is yours to shape.
On a shoot, the Progress card shows all the stages with the current one highlighted, and beneath them a line for every stage the shoot has been through — when it started, and how long it lasted. Tap Move to… at the bottom to move it on a stage. Tapping any other stage offers two things: correct the date it entered that stage, or move the shoot there — forwards or back, so marking a shoot delivered by mistake is not a dead end.
Customising your stages — Settings → Progress stages:
- Rename any stage, including the first and last.
- Add, remove, and reorder the stages in between.
- Booked (the start) and Delivered (the finish) are fixed anchors — you can rename them, but they can’t be deleted or moved, because the app uses “started vs. finished” throughout. They’re marked Start and Finish.
- Removing a middle stage safely moves any shoot currently in it back to the previous stage.
Money and invoices
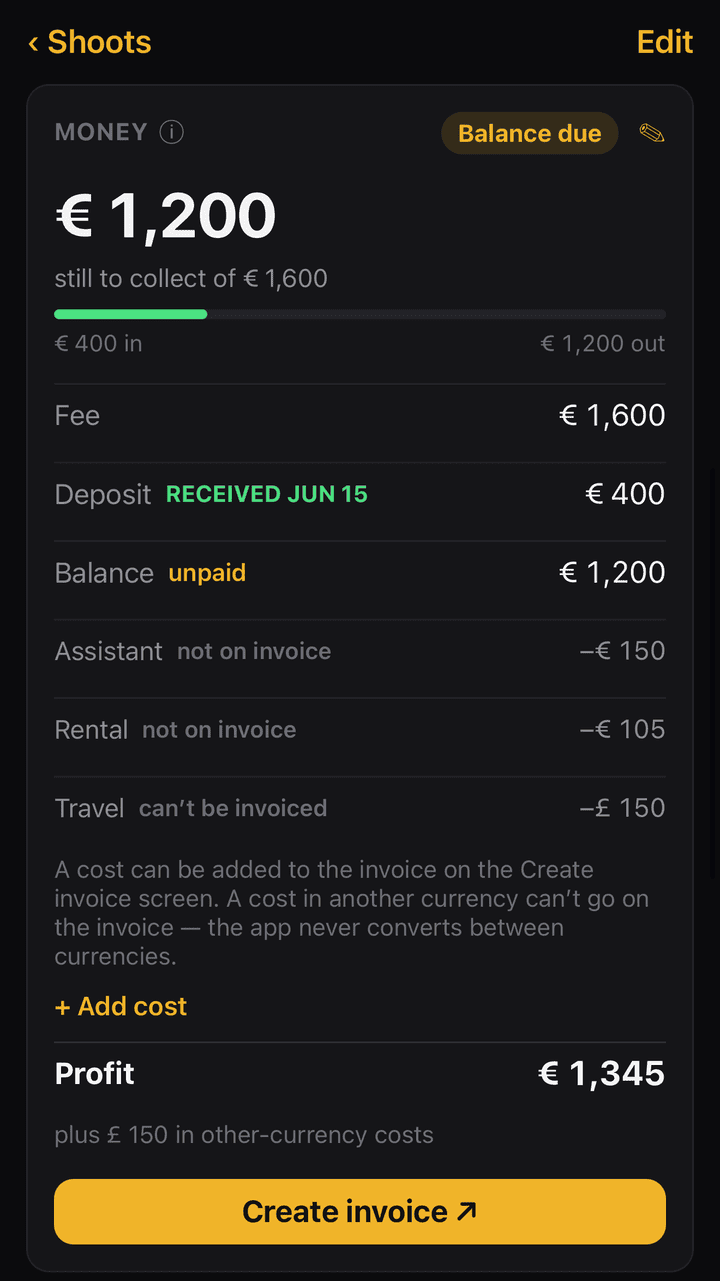
Tracking the money. On a shoot’s Money card, tap ✎ to add the fee, a deposit, and any costs (travel, rental, and so on). The card shows the balance, marks the deposit received and balance paid, and works out your profit.
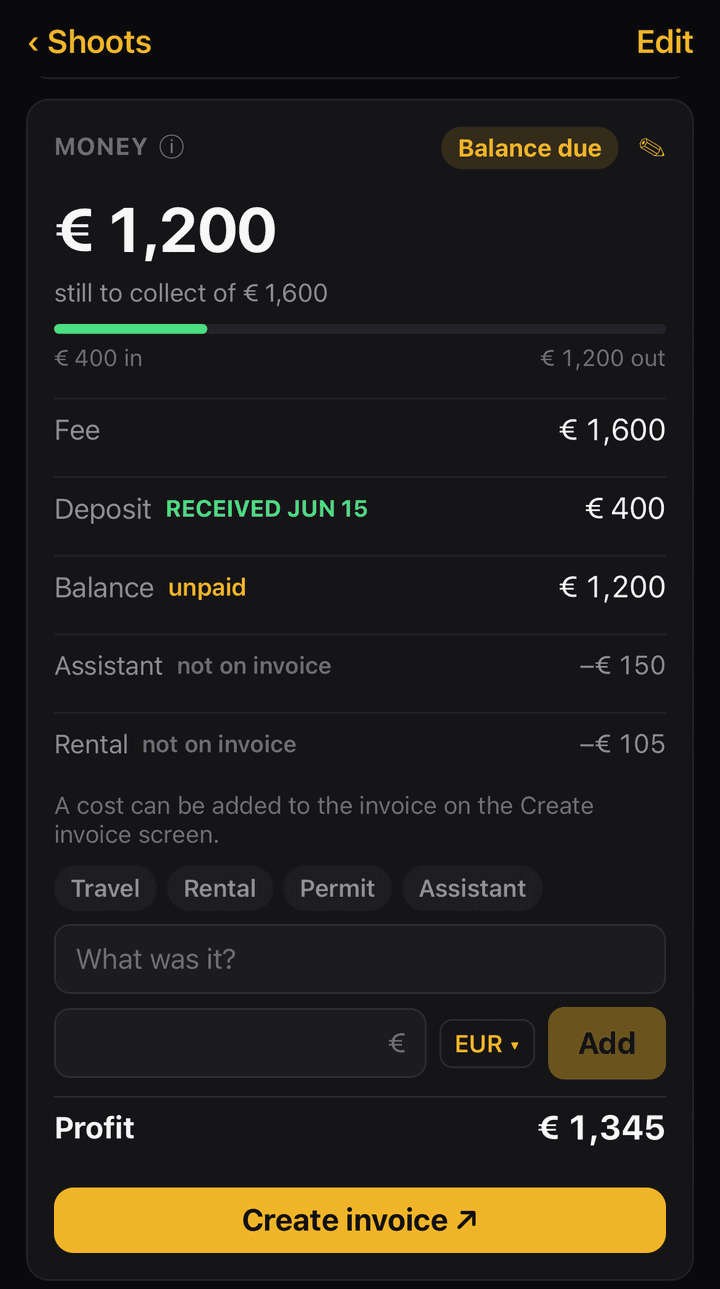
Each cost carries a small tag saying where it stands: on invoice if it is billed to the client, not on invoice if you are absorbing it, or can’t be invoiced — which happens when a cost is in a different currency from the shoot, since the app never converts between currencies. A line underneath explains whichever tags are showing.
Currencies. Each shoot has its own currency, and each cost can too. The app never invents exchange rates — instead it groups amounts by currency and shows a subtotal for each. Totals on the home screen and in money history do the same. Set your usual currency under Settings → Default currency.
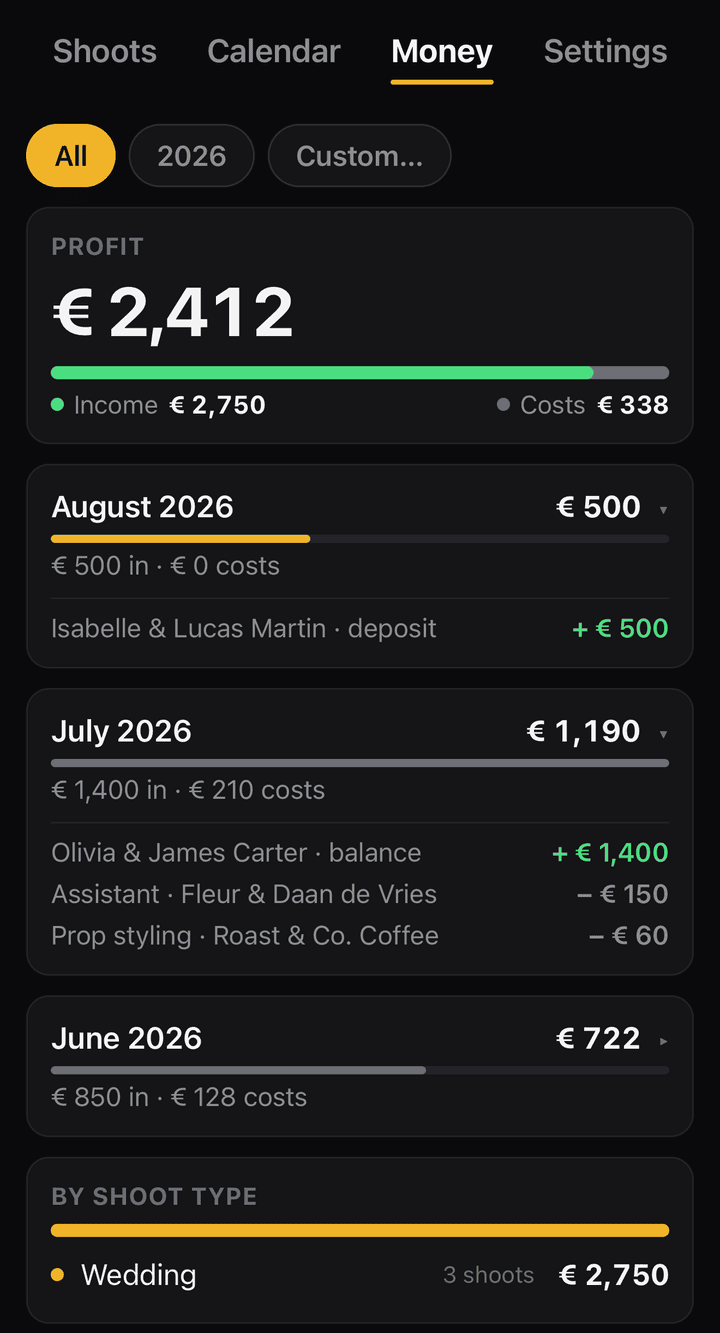
Money history. Open the Money tab at the top of the screen. You’ll see each month’s income, costs, and profit, per currency. Filter with the year chips, or tap Custom… to set an exact From–To month range — handy for a quarter, a season, or a single month.
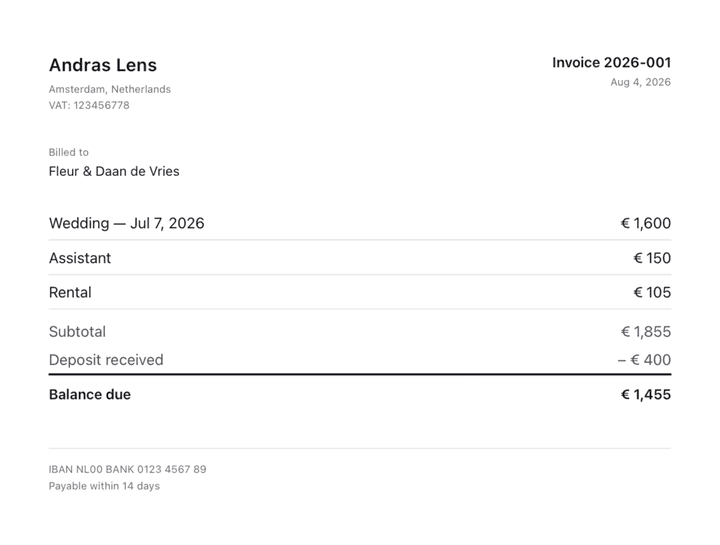
Invoices. Before your first invoice, fill in Settings → Business details: your name, address, free-text legal lines (tax and registration numbers, in any language, exactly as your country requires), payment details, and an optional logo. The app prints these as-is; making sure they meet your local rules is up to you.
To create one, open a shoot with a fee and tap Create invoice on the Money card. Everything is pre-filled:
- A suggested invoice number (year-based, e.g.
2026-001, editable) - The date and the client’s billing details
- An on/off switch for each logged cost — bill it to the client or keep it as your own expense
- A free-text tax line
- A deposit-as-paid toggle
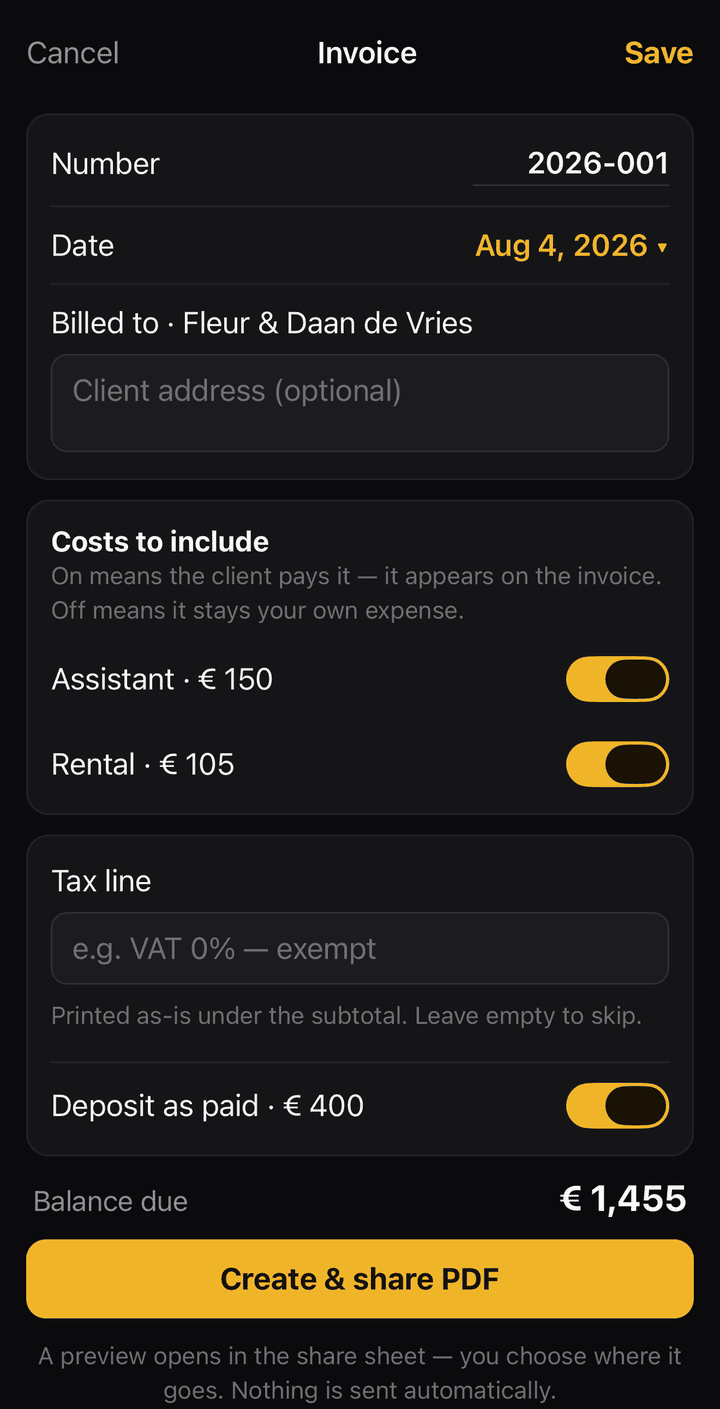
Tap Create & share PDF. The invoice is generated on your phone and the share sheet opens — send it by email, message, or save it to Files. Nothing is sent automatically. Afterwards the Money card shows Invoiced · [number], and you can reopen it to re-share or adjust.
Daylight times
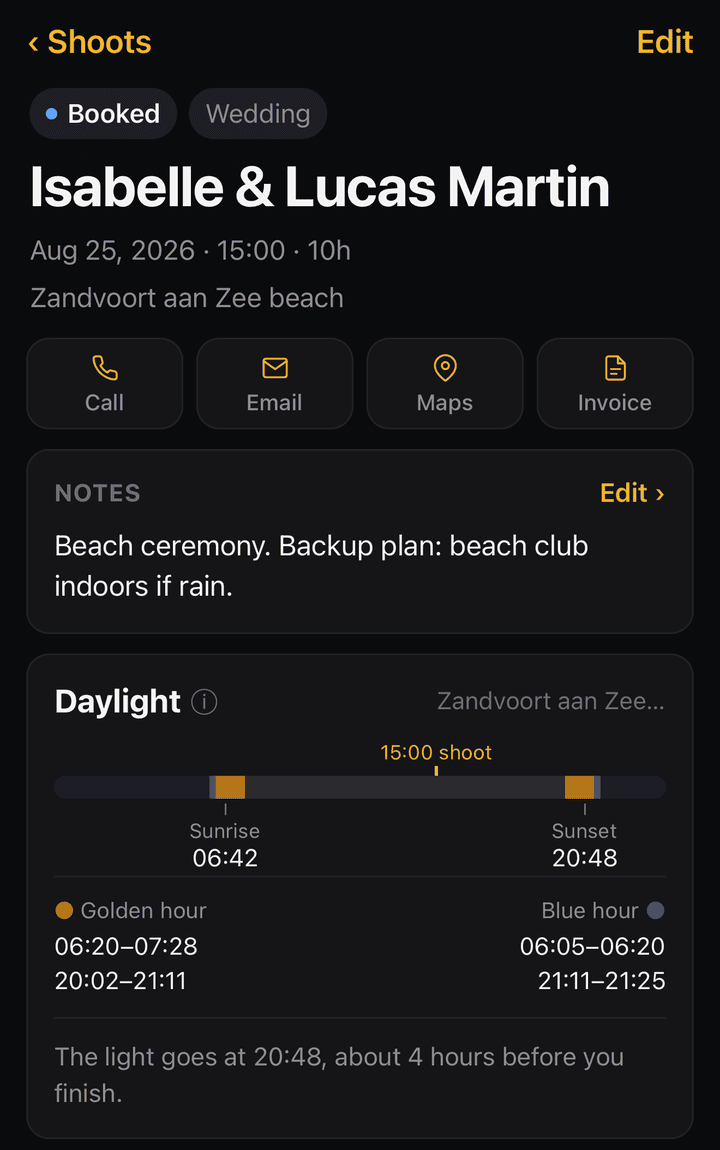
The Daylight card shows the sunrise, sunset, golden hour, and blue hour for a shoot — worked out on your phone from the shoot’s date and map pin, with no internet needed.
A ribbon shows the whole day, with sunrise and sunset marked and your scheduled shoot time flagged so you can see where it falls. The exact golden- and blue-hour ranges (morning and evening) are listed below.
It needs a map pin. A typed address isn’t enough to compute the sun — drop a pin on the shoot’s location (from the shoot form, or tap the prompt on the card). Times use your phone’s clock, so they’re exact for shoots near home and roughly off by the time difference for shoots abroad.
Calendar sync
The app can mirror your shoots into your phone’s own calendar. Under Settings → Calendar sync:
- Target calendar — which calendar to write to.
- Auto-sync after changes — when on, your calendar updates itself whenever you add or change a shoot. Each shoot adds two entries: the shoot appointment and the delivery-due date.
- Alert before shoot — optionally attach a pop-up alert to each shoot appointment (Off, at start, 15 minutes, 1 hour, or 1 day before). This uses your phone’s own calendar alert, so it also reaches your Mac or iPad. It’s off by default. Delivery deadlines aren’t affected — the app already reminds you about those.
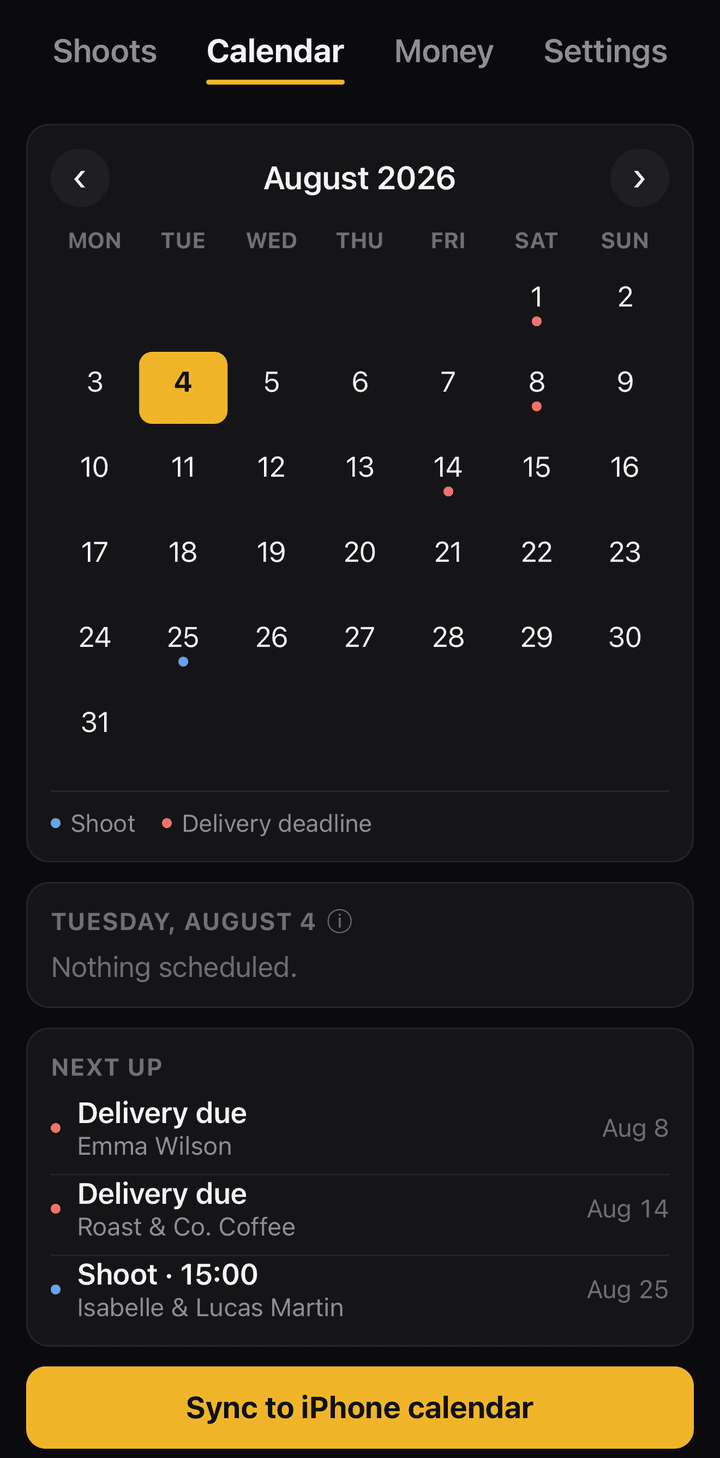
One thing to know: the calendar mirrors the app. If you delete one of these entries by hand in your phone’s calendar, it comes back on the next sync — to remove one for good, change or delete the shoot in the app.
Reminders and notifications
Under Settings → Notifications, the app can remind you about delivery deadlines:
- Deadline reminder — a notification a set number of days before each deadline, at a time you choose.
- Overdue alert — a notification the day after a deadline passes, if the shoot isn’t delivered yet.
These are the app’s own notifications, scheduled on your device. Checklist items can carry due dates to keep you organised, but they don’t send their own notifications — the reminders are about the delivery deadline.
Shoot types and templates
Each shoot type (Wedding, Portrait, Music video, or anything you create) carries three templates, so a new shoot of that type arrives ready to work:
- a delivery checklist,
- a packing list, and
- a shot list.
Settings → Shoot types & deadlines is where you add or rename types and set each one’s default delivery window. Settings → Checklist templates is where you customise the three lists for each type — rename, add, remove, and reorder items. Changes apply to shoots created afterwards; shoots you already have keep their current lists.
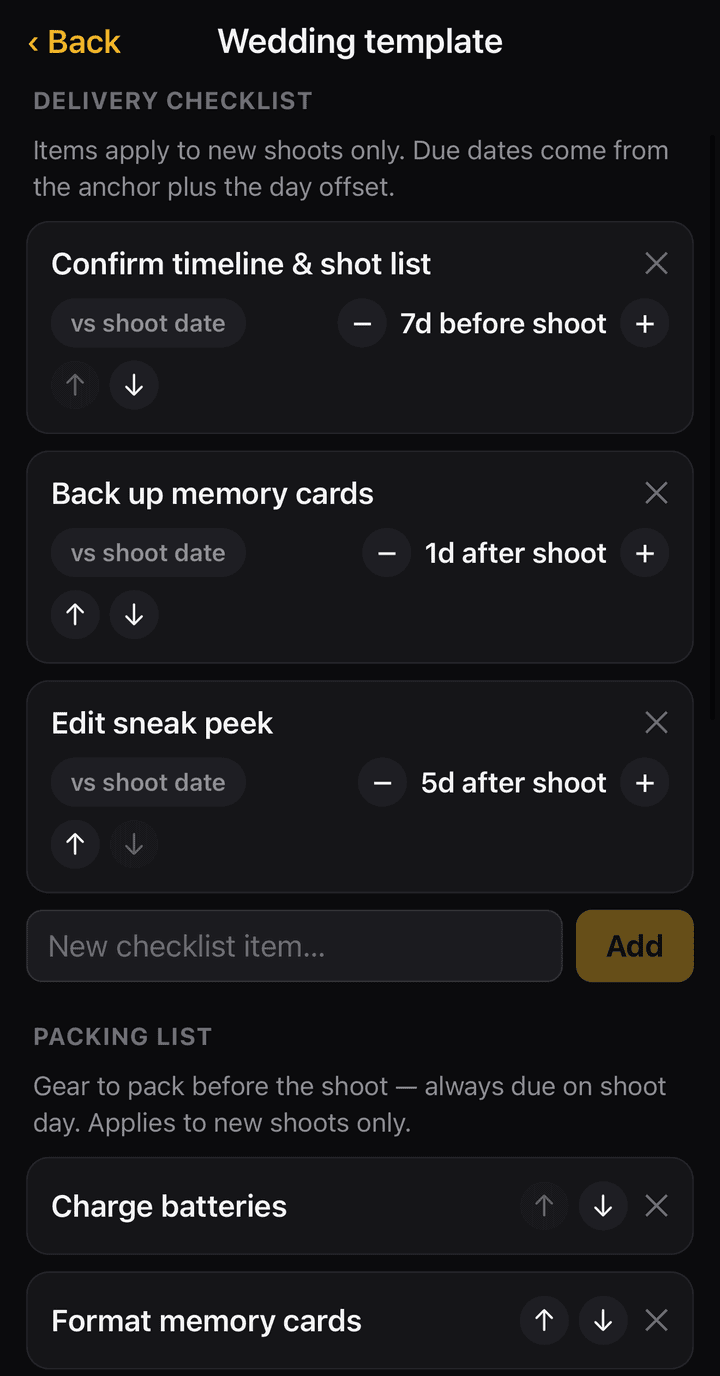
Tip: shape these templates once to match your workflow and every future booking starts a step ahead.
Settings
A quick map of everything under the Settings tab:
Shoots
- Shoot types & deadlines
- Checklist templates
- Progress stages
Display
- Appearance — System, Night, Day
- First day of week, Time format
- Default currency
- Open locations in
- Highlight shoots due in
- Arrange cards
Notifications & Calendar
- Deadline reminders, timing, overdue alert
- Calendar sync — target, auto-sync, alert before shoot
Invoicing, Help & Data
- Business details — details & logo
- Contact & support, Replay welcome tour, About
- Export / Restore backup, Remove demo data, Delete all data
Backup and restore
Because everything lives on your phone, keeping a backup is worth the ten seconds it takes.
- Export backup (Settings → Data) saves everything — shoots, checklists, notes, money, invoices, settings, and your custom stages — into a single file, and opens the share sheet so you can put it wherever you like (Files, iCloud Drive, email it to yourself, AirDrop to a computer).
- Restore backup reads such a file back and replaces the app’s current data with it. You’ll be asked to confirm first, because it overwrites what’s there.
A good habit: export a backup now and then, and always before switching phones.
Getting help
Settings → Contact & support opens a page to reach the person who built the app directly. Choose Report a problem or Share an idea and your email app opens with the message pre-addressed; a few technical lines (app version, phone model) are added at the bottom to help with troubleshooting — feel free to delete them. Every message is read personally.
FAQ & troubleshooting
Does it need an internet connection?
No. Everything works offline. The only features that reach outside the app are ones you trigger yourself — sharing an invoice or backup, opening a map, or syncing to your calendar.
Is my client data uploaded anywhere?
No. There’s no account and no cloud. Your data stays on your device unless you export it.
The Daylight card is empty / says to drop a pin.
Daylight is calculated from the shoot’s map pin. Open the shoot, add a location, and drop a pin on the map — the times appear once there’s a pin.
A calendar event I deleted keeps coming back.
The calendar mirrors the app. Delete or change the shoot in the app to remove its calendar entries for good.
My shoot won’t let me create an invoice.
Invoices need a fee on the shoot, and your Business details filled in (Settings → Business details). Add those and the Create invoice option is ready.
Which currencies does it support?
Any. Set a default, and change it per shoot or per cost. The app groups amounts by currency and never converts between them.
Can I change the workflow stages?
Yes — Settings → Progress stages. Rename, add, remove, and reorder the stages between Booked and Delivered.
Is there an Android version?
Yes. The app runs on iPhone and Android, and works the same way on both.
How do I get the example shoots out?
Settings → Remove demo data. It clears the examples and leaves your own work untouched.